Table of Contents
False ceiling installation has become a popular choice for modern homes and commercial spaces, offering aesthetic appeal, improved acoustics, and concealed wiring solutions. However, improper installation can lead to structural issues, aesthetic disappointments, and costly repairs. Understanding the most common mistakes before starting your project can save you time, money, and frustration.
Inadequate Structural Assessment
One of the most critical errors is failing to properly assess the existing ceiling structure before installation. Many contractors rush into installation without evaluating the load-bearing capacity of the original ceiling. Every suspended ceiling system adds weight to the structure, and without proper assessment, you risk structural failure or sagging over time.
Before beginning any project, conduct a thorough inspection of the existing ceiling’s condition, identify the material composition, and determine the placement of beams and joists. This assessment should also include checking for existing damage, water leaks, or pest infestations that need addressing before covering them with a new installation. Ignoring these foundational issues will only compound problems later.
Poor Framework and Support System
The framework forms the skeleton of your suspended ceiling, and cutting corners here is a recipe for disaster. Using substandard materials for the framework, such as low-quality metal channels or inadequate hangers, compromises the entire installation. Some installers space the hangers too far apart to save on materials, but this leads to uneven surfaces and potential collapse.
The framework must be level and properly aligned. Many installation failures result from rushed framework setup where measurements aren’t double-checked. Even a slight deviation in the framework level becomes glaringly obvious once the ceiling panels are installed. Always use quality galvanized steel or aluminum framework components, ensure hangers are spaced according to manufacturer specifications (typically every 3-4 feet), and use a laser level to guarantee perfect alignment.
Incorrect Material Selection
Choosing the wrong materials for your specific environment is a surprisingly common mistake. Not all ceiling materials perform equally in different conditions. Installing moisture-sensitive gypsum boards in bathrooms or kitchens without proper waterproofing leads to warping, staining, and deterioration. Similarly, using standard materials in areas with high humidity or temperature fluctuations causes premature failure.
Consider the room’s purpose and environmental conditions when selecting materials. Moisture-resistant or waterproof boards are essential for wet areas. Fire-rated materials should be used in kitchens and areas where fire safety is paramount. For commercial spaces, acoustic ceiling tiles might be necessary to control sound. Each material has specific installation requirements, and failing to follow these guidelines compromises the installation’s integrity and longevity.
Inadequate Lighting Planning
A false ceiling installation offers excellent opportunities for integrated lighting, but poor planning in this area creates both functional and aesthetic problems. One major mistake is failing to plan lighting placement before framework installation. Once the framework is up, making changes becomes complicated and expensive.
Another error is not leaving adequate clearance for recessed lighting fixtures. Each fixture type requires specific depth clearance, and insufficient space leads to heat buildup, which poses fire hazards and shortens bulb life. Additionally, improper spacing of lights creates uneven illumination with dark spots and overly bright areas. Plan your lighting layout on paper first, consider the purpose of each space, ensure proper electrical wiring is routed before closing the ceiling, and verify clearance requirements for all fixtures before finalizing the framework height
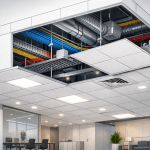
Ventilation and Access Panel Oversights
Sealing off the plenum space without adequate ventilation is a mistake that leads to multiple problems. The space between your original ceiling and the suspended ceiling needs proper air circulation to prevent moisture buildup, mold growth, and heat accumulation. In commercial spaces, this oversight can even violate building codes.
Equally problematic is failing to install sufficient access panels. The space above your suspended ceiling will house electrical wiring, plumbing, HVAC ducts, and other utilities that may require maintenance or repair. Without strategically placed access panels, future maintenance becomes a nightmare requiring destructive removal of ceiling sections. Install access panels near all critical utility junctions, ensure panels are easily removable but secure, place them in less visible areas when possible, and make them large enough for practical access.
Ignoring Height and Proportion
Installing a suspended ceiling without considering room proportions and minimum height requirements creates spaces that feel cramped and claustrophobic. A common error is dropping the ceiling too low, especially in rooms with already limited height. Most building codes require minimum ceiling heights, and even if you’re technically compliant, going too low makes spaces feel uncomfortable.
The standard drop for suspended ceilings ranges from 6 to 12 inches, but this should be adjusted based on your room’s original height and the utilities that need concealment. In residential spaces with 8-foot ceilings, consider whether a false ceiling is truly necessary, as the height reduction might outweigh the benefits.
Rushing the Finishing Work
The final mistake many contractors make is rushing through the finishing details. Visible gaps between panels, uneven joints, poorly finished edges, and mismatched panel colors all detract from the final appearance. These issues often result from impatience during the final stages of installation when the end is in sight.
Take time to properly trim and fit each panel, seal all joints appropriately, paint or finish edges cleanly, and ensure consistent appearance across all panels. Quality finishing work distinguishes a professional installation from an amateur one.
Conclusion
A successful false ceiling installation requires careful planning, quality materials, skilled execution, and attention to detail. By avoiding these common mistakes, you ensure a ceiling that not only looks beautiful but also performs reliably for years to come. Whether you’re hiring professionals or undertaking a DIY project, understanding these pitfalls helps you make informed decisions and achieve results you’ll be proud of.
Ready to Build with Confidence?
Get in touch with Charminar to learn how our project management expertise can streamline your next development.
📧 contact@bluediamondfm.com
📞 +971 56 705 4223
🌐 https://charminardubai.com/
Frequently Asked Questions (FAQ)
What is the minimum room height required for false ceiling installation?
The minimum recommended room height for installing a suspended ceiling is 9 feet. With a typical 6-8 inch drop, this leaves you with adequate headroom. In rooms with 8-foot ceilings, consider whether the aesthetic and functional benefits justify the reduced height. Some jurisdictions have building codes that mandate minimum ceiling heights, typically around 7.5 feet for habitable spaces.
How long does a properly installed false ceiling last?
A well-installed suspended ceiling using quality materials can last 15-25 years or more. The lifespan depends on material quality, environmental conditions, maintenance, and whether the installation was done correctly. Gypsum board ceilings in dry conditions can last over 20 years, while POP (Plaster of Paris) installations might need refinishing every 10-15 years. Regular inspections and minor maintenance extend the ceiling’s life significantly.
Can I access wiring behind false ceilings easily?
While DIY installation is possible for those with construction experience, professional installation is recommended for most homeowners. Suspended ceiling installation requires precise measurements, proper framework assembly, electrical knowledge for lighting integration, and understanding of load-bearing principles. Mistakes can be costly to fix and may pose safety risks. If you choose DIY, start with a small, simple room and ensure you thoroughly research all requirements.
What's the cost difference between different false ceiling materials?
Costs vary significantly by material. POP (Plaster of Paris) typically costs $3-5 per square foot, gypsum board ranges from $4-8 per square foot, mineral fiber tiles cost $2-4 per square foot, and premium materials like wood or metal can exceed $10-15 per square foot. These prices usually include materials and basic installation. Complex designs, integrated lighting, and premium finishes increase costs substantially.
How do I maintain my false ceiling after installation?
Regular maintenance includes dusting panels every few months using a soft brush or vacuum with brush attachment, checking for stains or discoloration that might indicate leaks, inspecting the framework for any signs of sagging or loosening, ensuring ventilation openings remain clear, and addressing any damage immediately to prevent spreading. Avoid using water or harsh chemicals on most ceiling materials unless they’re specifically waterproof. Schedule professional inspections every 2-3 years to catch potential issues early.